Everything with Pictures in PowerPoint – Part 1
Pictures in PowerPoint serve in a variety of levels and are great to introduce a subject, visualize a topic and make your overall presentation more enjoyable. This blog is part of a tutorial where we will be showing the basics of inserting and editing images to more advanced techniques and tricks.
This blog will cover the following topics:
- Insert Pictures – the basics and first edits
- Cropping pictures
- Coloring pictures
- Combining colors and black and white pictures
1. Inserting a Picture
 Basic – click on >Insert, >picture icon, and choose your selected image (this makes your picture fit the PPT slide exactly).
Tip: to adjust the size of your picture press >ctrl and click the corner of the picture, then move your mouse cursor to the desired size.
1.2 The First Edits
Once you have inserted a picture, you should see in the top of the menu bar that the register automatically opens to picture tools. This gives you the possibility to choose from a diverse set of picture frames.

Left and right from the menu, you will find further picture editing options.
On the right side, you can pick individual >Picture Borders or try the >Picture Effects for a greater impact. You may already know this from the processing of standard forms; however, the visual effect of pictures here is far greater. Alone with the shadows and reflections, you can create a classy looking appearance. This is optimal if you need to quickly create rich visual imagery as for example in title, dividing, or chapter slides. Also, try the 3D options to present your image in various optical illusions. Slight differences in the respective settings can greatly impact the overall look of your presentation.
The >Picture Layout further allows you to use a variety of pre-designed picture layout forms – great for describing individual images or a set group.

These picture layouts are based on the functions of SmartArts and thus behave in the same way. By clicking on the image, you can expand or shrink the layout graphic, according to your preference. To further enlarge the graphic set, simply click on the left hand side of the open menu field and hit the >enter key. This should reproduce the same graphic, you can now fill in the text and keep hitting >enter until you have the desired amount of layout graphics you want.
Insert your images into the graphic by clicking on the image picture icon. To exchange pictures, click on the picture, go to >Format and >Change Picture.

Note of caution: when inserting pictures you may stumble on different image proportions causing the picture you insert to be out of focus, not to the right proportion or perhaps not in the correct spot you wish it to be. No worries! It’s not that hard to fix. First, click on the image, then go to >Format/ Picture Tools and open >Crop, go down to >Fill. The picture should now be resized and you can also zoom in or out and drag it to your desired location on the slide.
Note: remember to hit the >shift key when dragging or resizing your picture! This will keep your picture from becoming distorted.
2. Cropping Pictures
Basic – Cropping pictures probably belongs to one of the most used tools when working with images. This procedure is quiet simple, but you should generally always take note of the details in the picture to avoid unnecessary work. Once you have inserted a picture, go to >Format/ Picture Tools, >Crop and this first option, >Crop. Move the black lines on the side of the picture to crop the image (left picture). Then when you finish, simply click on the outside of your picture box and the changes you have made will register.
An even faster option to crop is to simply move the picture crop box (right picture). Either way, cropping just became easy!

2.1 Crop Your Images to Custom Shapes
You can also crop your images to all different kinds of custom shapes. Click on >Format, >crop, and >crop to shape. Choose from a broad variety of shapes.


2.2 The Role of Resolution
With increasing megapixels (MPix), the space capacity to save a presentation can quickly get very big. Always consider that a photo doesn’t really get cut, but rather that its parts are hidden. Cut photos still have the MPix of the original! Only by manually deleting the cropped areas of a picture, will space be saved. To compress pictures click on >Format/ Picture Tools, >Compress Pictures (on the left side of the picture styles), then choose >96ppi.

You can see the automatic compression of pictures under >File, >Options, >Advanced, then under Image Size and Quality pick >96 ppi. For a printout, 150 ppi or 200 ppi should be big enough. Always try to reduce the images in your presentation as not doing so can be memory intensive and cause long downloading times and potentially create more problems than expected or needed.
Unfortunately, sometimes compressing has no effect. It is therefore better to altogether compress pictures in an external drive to certify that they are really compressed. This also ensures that the quality may be better because more sophisticated algorithms are used.
3. Color Your Picture, Make it Transparent
For standard use, the option to change a pictures color and artistic appearance may not be common, yet these applications are often used to change the appearance of a background image or wallpaper, or to create a graphic layout element or special slides like dividers or title slides.
3.1. Colors of all Kinds
With the button >Color (on the left upper hand corner), you can change the saturation and color tone of your image. The term color may be a bit misleading as only the pictures’ contrast, brightness levels and shades are changed. However, exactly this is useful when changing the background picture or slide master.

Interesting optical illusions result in achieving a variety of default options and may be further enhanced by >more variations, and >set transparent colors.

Use the >set transparent color to erase certain parts of your image. Specifically, only identical pixels will be erased depending on the place you click the image. This feature will neither make your whole image transparent nor will it cut out your image (how to do this will be discussed in a later blog post).

The >Picture color options will bring you to the Format Picture menu and give you further detailed options of editing your images.
3.2. Make a Photo Transparent
Insert a rectangle shape onto your slide. Then right click the rectangle, >Format Shape, >Fill, >Picture or texture fill, select >File and choose the picture you want to insert. After inserting the picture, you can adjust the transparency by moving the arrow at the bottom. Here you can also set the transparency to a certain percentage level. The picture on the left shows the transparency with a blue box in the background.


Fitting to this theme, is also the question of contrast and brightness variations of the image. You can adjust these preferences by >right clicking and going to >Picture Corrections.

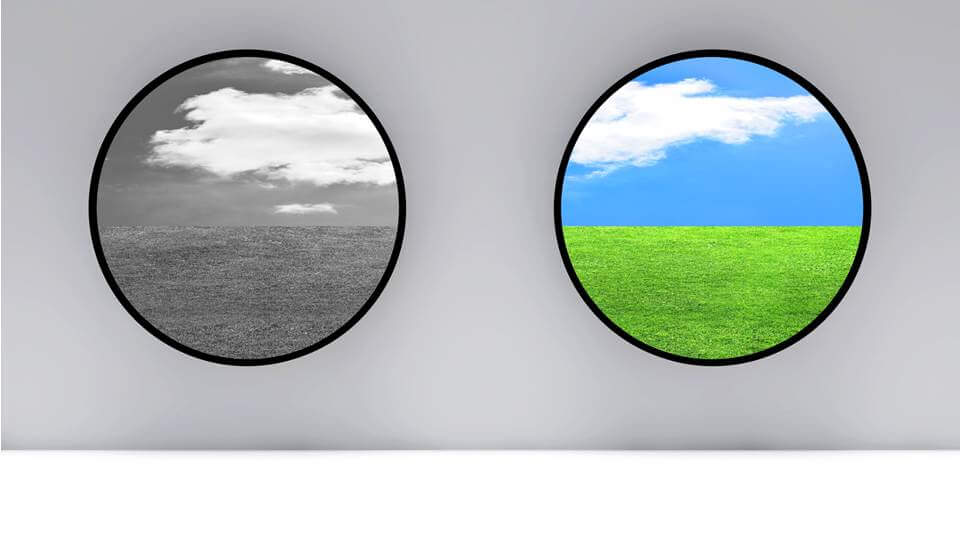
4. Colors to Black and White
Depending on the subject, you can create a catchy graphic by combining color and black and white settings to your picture. To do this, duplicate your image and stack them on top of each other. Make the image on top black and white. Then go to >Crop and pull the image down. The colored image underneath should appear giving an impression of a half black and white image.
If you want to add a text that stands out, try adding a glow around the text – this works especially well for black and white images. Highlight the text, right click, >Format text effects, >Glow and Soft Edges and change the color, size and transparency.

To give an even more impressive appearance as for example when talking about the past vs. the future add an animation of a fading black and white image: click on the image and go to >Animations and >Fade. Try it for yourself, you will be impressed!
Stay tuned for our upcoming blog posts about tips and tricks using pictures in PowerPoint!
Share this post


-

Design Thinking: Problem Solving with a Difference
-
Why Corporate Mission Statements Are So Important
-
7 Tips & Learnings from the Apple Keynote


-
Design Thinking: Problem Solving with a Difference
-
Why Corporate Mission Statements Are So Important
-
7 Tips & Learnings from the Apple Keynote